React基础知识(一)
— 2019年5月22日JSX
什么是 JSX
是一种 JS 和 HTML 混合的语法,将组件的结构、数据甚至样式都聚合在一起定义组件
ReactDOM.render(<h1>Hello</h1>, document.getElementById("root"));什么是元素
- JSX 其实只是一种语法糖,最终会通过 babeljs 转译成 createElement 语法
- React 元素是构成 React 应用的最小单位
- React 元素用来描述你在屏幕上看到的内容
React元素事实上是普通的JS对象,ReactDOM 来确保浏览器中的 DOM 数据和 React 元素保持一致
// jsx
<h1 className="title" style={{color:'red'}}>hello</h1>

// 编译后
React.createElement("h1", {
  className: "title",
  style: {
    color: 'red'
  }
}, "hello");

// createElement的结果
{
  type:'h1',
  props:{
    className: "title",
    style: {
      color: 'red'
    }
  },
  children:"hello"
}
组件&Props
函数组件
- 函数组件接收一个单一的 props 对象并返回了一个 React 元素
function Welcome(props) {
  return <h1>Hello, {props.name}</h1>;
}
类组件
class Welcome extends React.Component {
  render() {
    return <h1>Hello, {this.props.name}</h1>;
  }
}- 总结:创建组件有两种方式“函数式”,“创建类式”
- 函数组件
- 实现功能简单,只是简单的调用和返回 JSX 而已(16 版本中出了 hooks 就不一样了)
- 类组件
- 可以实现复杂的业务功能
- 能够使用生命周期操作业务
- 函数式可以理解为静态组件(组件中的内容调取的时候就已经固定里,很难修改),而类这种方式,可以基于组件内部的状态来动态更新渲染的内容
- 函数组件
组件渲染
- React 元素不但可以是 DOM 标签,还可以是用户自定义的组件
- 当 React 元素为用户自定义组件时,它会将 JSX 所接收的属性(attributes)转换为单个对象传递给组件,这个对象被称之为 props
- 组件名称必须以大写字母开头
- 组件必须在使用的时候定义或引用它
- 组件的返回值只能有一个根元素
function Welcome(props) {
  return <h1>Hello, {props.name}</h1>;
}

const element = <Welcome name="zhufengjiagou" />;
ReactDOM.render(element, document.getElementById("root"));
props 组件之间的通信
- props 组件的属性是只读
不可修改- 无论是使用函数或是类来声明一个组件,它决不能修改它自己的 props
- 纯函数没有改变它自己的输入值,当传入的值相同时,总是会返回相同的结果
- 所有的 React 组件必须像纯函数那样使用它们的 props
//纯函数
function sum(a, b) {
  return a + b;
}
//非纯函数
function withdraw(account, amount) {
  account.total -= amount;
}- 设置 props 默认值(static)
props 是只读的,我们无法在方法中修改他的值,但是可以给默认值或者设置一些规则(例如:设置是否必须传递以及传递的类型等)
// 给props设置一些默认值
static defaultProps = {
  lx: '系统提示'
};- 类型检查
要在组件的 props 上进行类型检查,你只需配置特定的 propTypes 属性
import PropTypes from 'prop-types'; // 第三方插件

static propTypes = {
  con: PropTypes.string.isRequired //=> 不仅传递的内容是字符串,并且还必须传递
};
State&生命周期
state
- state 私有的属性/状态,并且完全受控于当前组件
- 使用 this.setState() 来时刻更新组件 state
class Clock extends React.Component {
  constructor(props) {
    super(props);
    this.state = { date: new Date() };
  }

  componentDidMount() {
    this.timerID = setInterval(() => this.tick(), 1000);
  }

  componentWillUnmount() {
    clearInterval(this.timerID);
  }

  tick() {
    this.setState({
      date: new Date(),
    });
  }

  render() {
    return (
      <div>
        <h1>Hello, world!</h1>
        <h2>It is {this.state.date.toLocaleTimeString()}.</h2>
      </div>
    );
  }
}
关于 setState() 你应该了解三件事:
- 不要直接修改 State
// 错误
this.state.comment = 'Hello';

// 正确
this.setState({comment: 'Hello'});

// 构造函数是唯一可以给 this.state 赋值的地方
constructor() {
  this.state = {date: new Date()};
}- State 的更新可能是异步的
- 出于性能考虑,React 可能会把多个 setState() 调用合并成一个调用
- 因为 this.props 和 this.state 可能会异步更新,所以你不要依赖他们的值来更新下一个状态
- 解决办法:可以让 setState() 接收一个函数而不是一个对象。这个函数用上一个 state 作为第一个参数
class Counter extends React.Component {
  constructor(props) {
    super(props);
    this.state = {
      number: 0,
    };
  }
  handleClick = () => {
    /**
     *
     * 下面例子这样处理计算是会被合并,执行了2次+1(结果应该是2),但是结果是1
     *
     */

    // this.setState({number:this.state.number+1});
    // console.log(this.state.number); // 0
    // this.setState({number:this.state.number+1});
    // console.log(this.state.number); // 0

    // 解决办法把它改成函数
    this.setState((state) => ({ number: state.number + 1 }));
    this.setState((state) => ({ number: state.number + 1 }));
  };
  render() {
    return (
      <div>
        <p> {this.state.number} </p>
        <button onClick={this.handleClick}>+</button>
      </div>
    );
  }
}- State 的更新会被合并
- 当你调用 setState() 的时候,React 会把你提供的对象合并到当前的 state
// 例如,你的 state 包含几个独立的变量:
constructor(props) {
  super(props);
  this.state = {
    posts: [],
    comments: []
  };
}

// 然后你可以分别调用 setState() 来单独地更新它们:
componentDidMount() {
  fetchPosts().then(response => {
    this.setState({
      posts: response.posts
    });
  });

  fetchComments().then(response => {
    this.setState({
      comments: response.comments
    });
  });
}
数据是向下流动的
- state 总是所属于特定的组件,而且从该 state 派生的任何数据或 UI 只能影响树中“低于”它们的组件
- 把一个以组件构成的树想象成一个 props 的数据瀑布的话,那么每一个组件的 state 就像是在任意一点上给瀑布增加额外的水源,但是它只能向下流动
生命周期
- 只有类组件才有生命周期
- hooks 出来之后有 useEffect 副作用操作的函数类似 class 的生命周期
- 你可以把 useEffect Hook 看做 componentDidMount,componentDidUpdate 和 componentWillUnmount 这三个函数的组合。
旧版生命周期
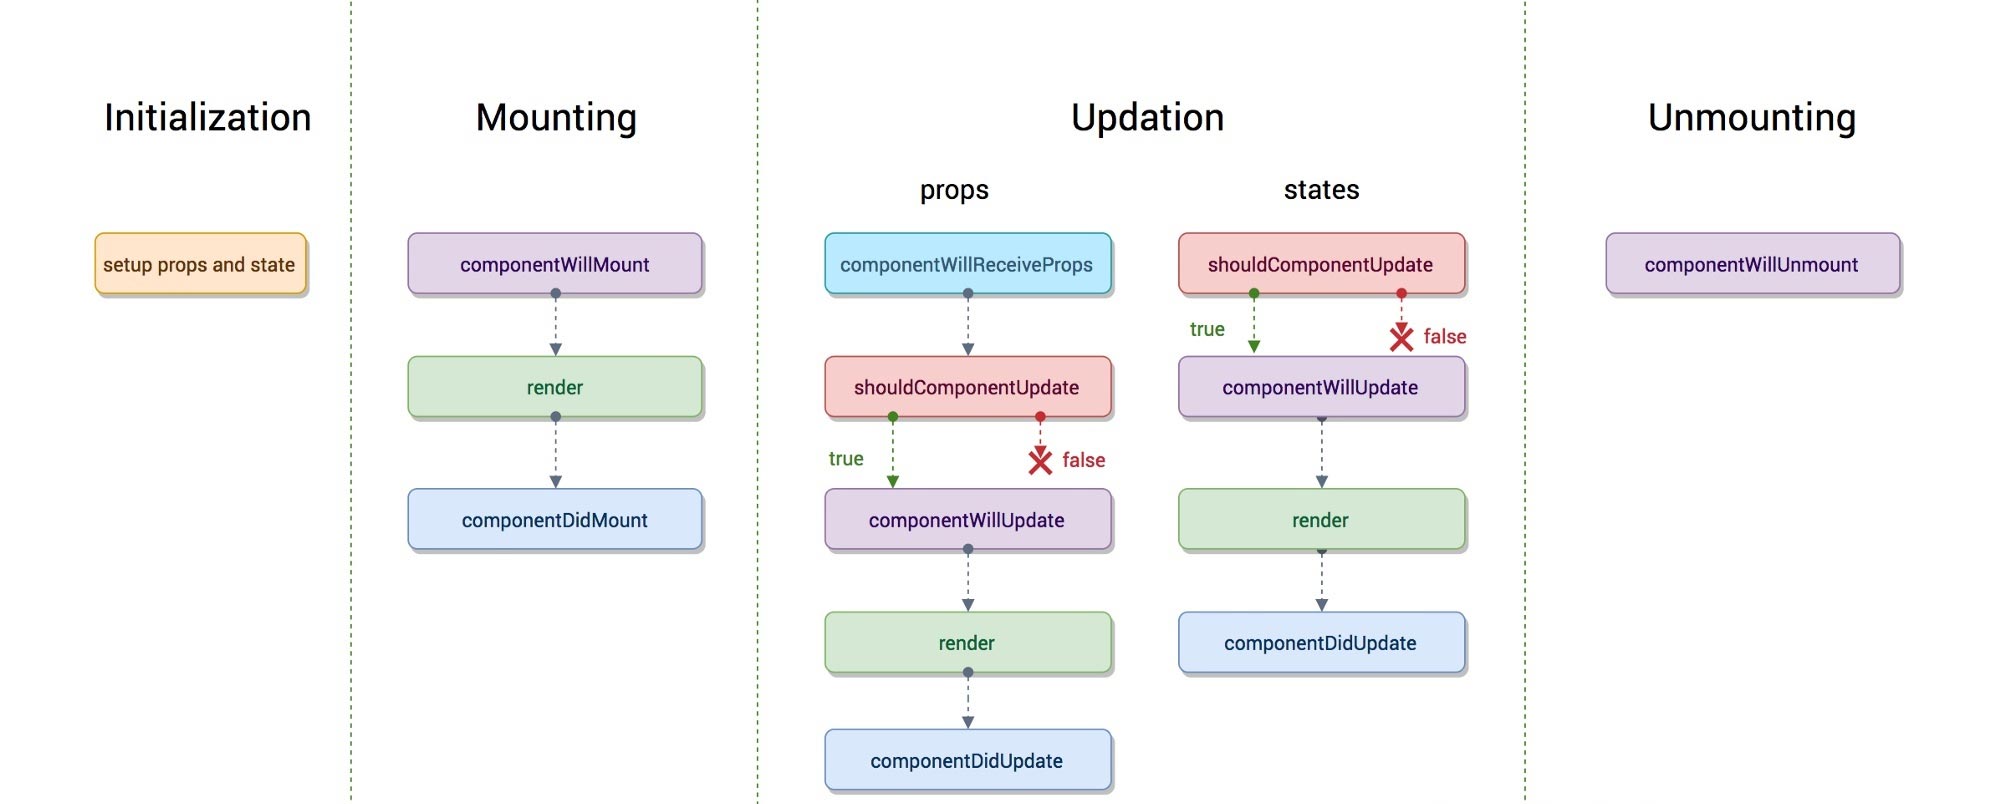
- [基础流程]
- constructor
componentWillMount 挂载前(新版已删除)- render 第一次渲染
- componentDidMount 第一次渲染之后
- [修改流程]
(当组件的状态发生改变 setState或者传递给组件的属性发生改变 重新调用组件传递不同的属性 都会引发render重新执行渲染)- shouldComponentUpdate 是否允许组件重新渲染
默认true(允许则执行后面函数,不允许直接结束即可) - componentWillUpdate 重新渲染前
- render 第二次及以后重新渲染
- componentDidUpdate 重新渲染之后
- componentWillReceiveProps 父组件把传递给子组件的属性发生改变后触发的钩子函数(会在 shouldComponentUpdate 之前执行)
- [卸载]
原有渲染的内容是不消失的,只不过以后不能基于数据改变视图了- componentWillUnmount 卸载组件之前(一般不用)
- 组件的加载顺序及状态变化加载顺序
class Counter extends React.Component<Props, State> {
  // 他会比较两个状态相等就不会刷新视图 PureComponent是浅比较
  /* 加载顺序 */
  // defaultProps
  // constructor
  // componentWillMount
  // render
  // componentDidMount
  // 状态(state)更新会触发的
  // shouldComponentUpdate nextProps, nextState=>boolean
  // componentWillUpdate
  // componentDidUpdate
  // 属性(props)更新
  // componentWillReceiveProps newProps
  // 卸载
  // componentWillUnmount
  /* 如果有子组件 */
  // 1.constructor构造函数
  // 2.组件将要加载 componentWillMount
  // 3.render
  //    子组件的初始化 => child constructor
  //    子组件挂载之前 => child componentWillMount
  //    子组件渲染DOM => child-render
  //    子组件挂载完成 => child componentDidMount
  // 4.组件挂载完成 componentDidMount
  /* 当父组件状态变化 */
  // 5.组件是否更新 shouldComponentUpdate
  // 6.组件将要更新 componentWillUpdate
  // 3.render 父组件渲染
  //    子组件监听到props变化 => child componentWillReceiveProps
  //    子组件渲染之前 => componentWillUpdate
  //    子组件渲染DOM => child-render
  //    子组件渲染之后 => componentDidUpdate
  // 7.组件完成更新 componentDidUpdate
}
新版生命周期
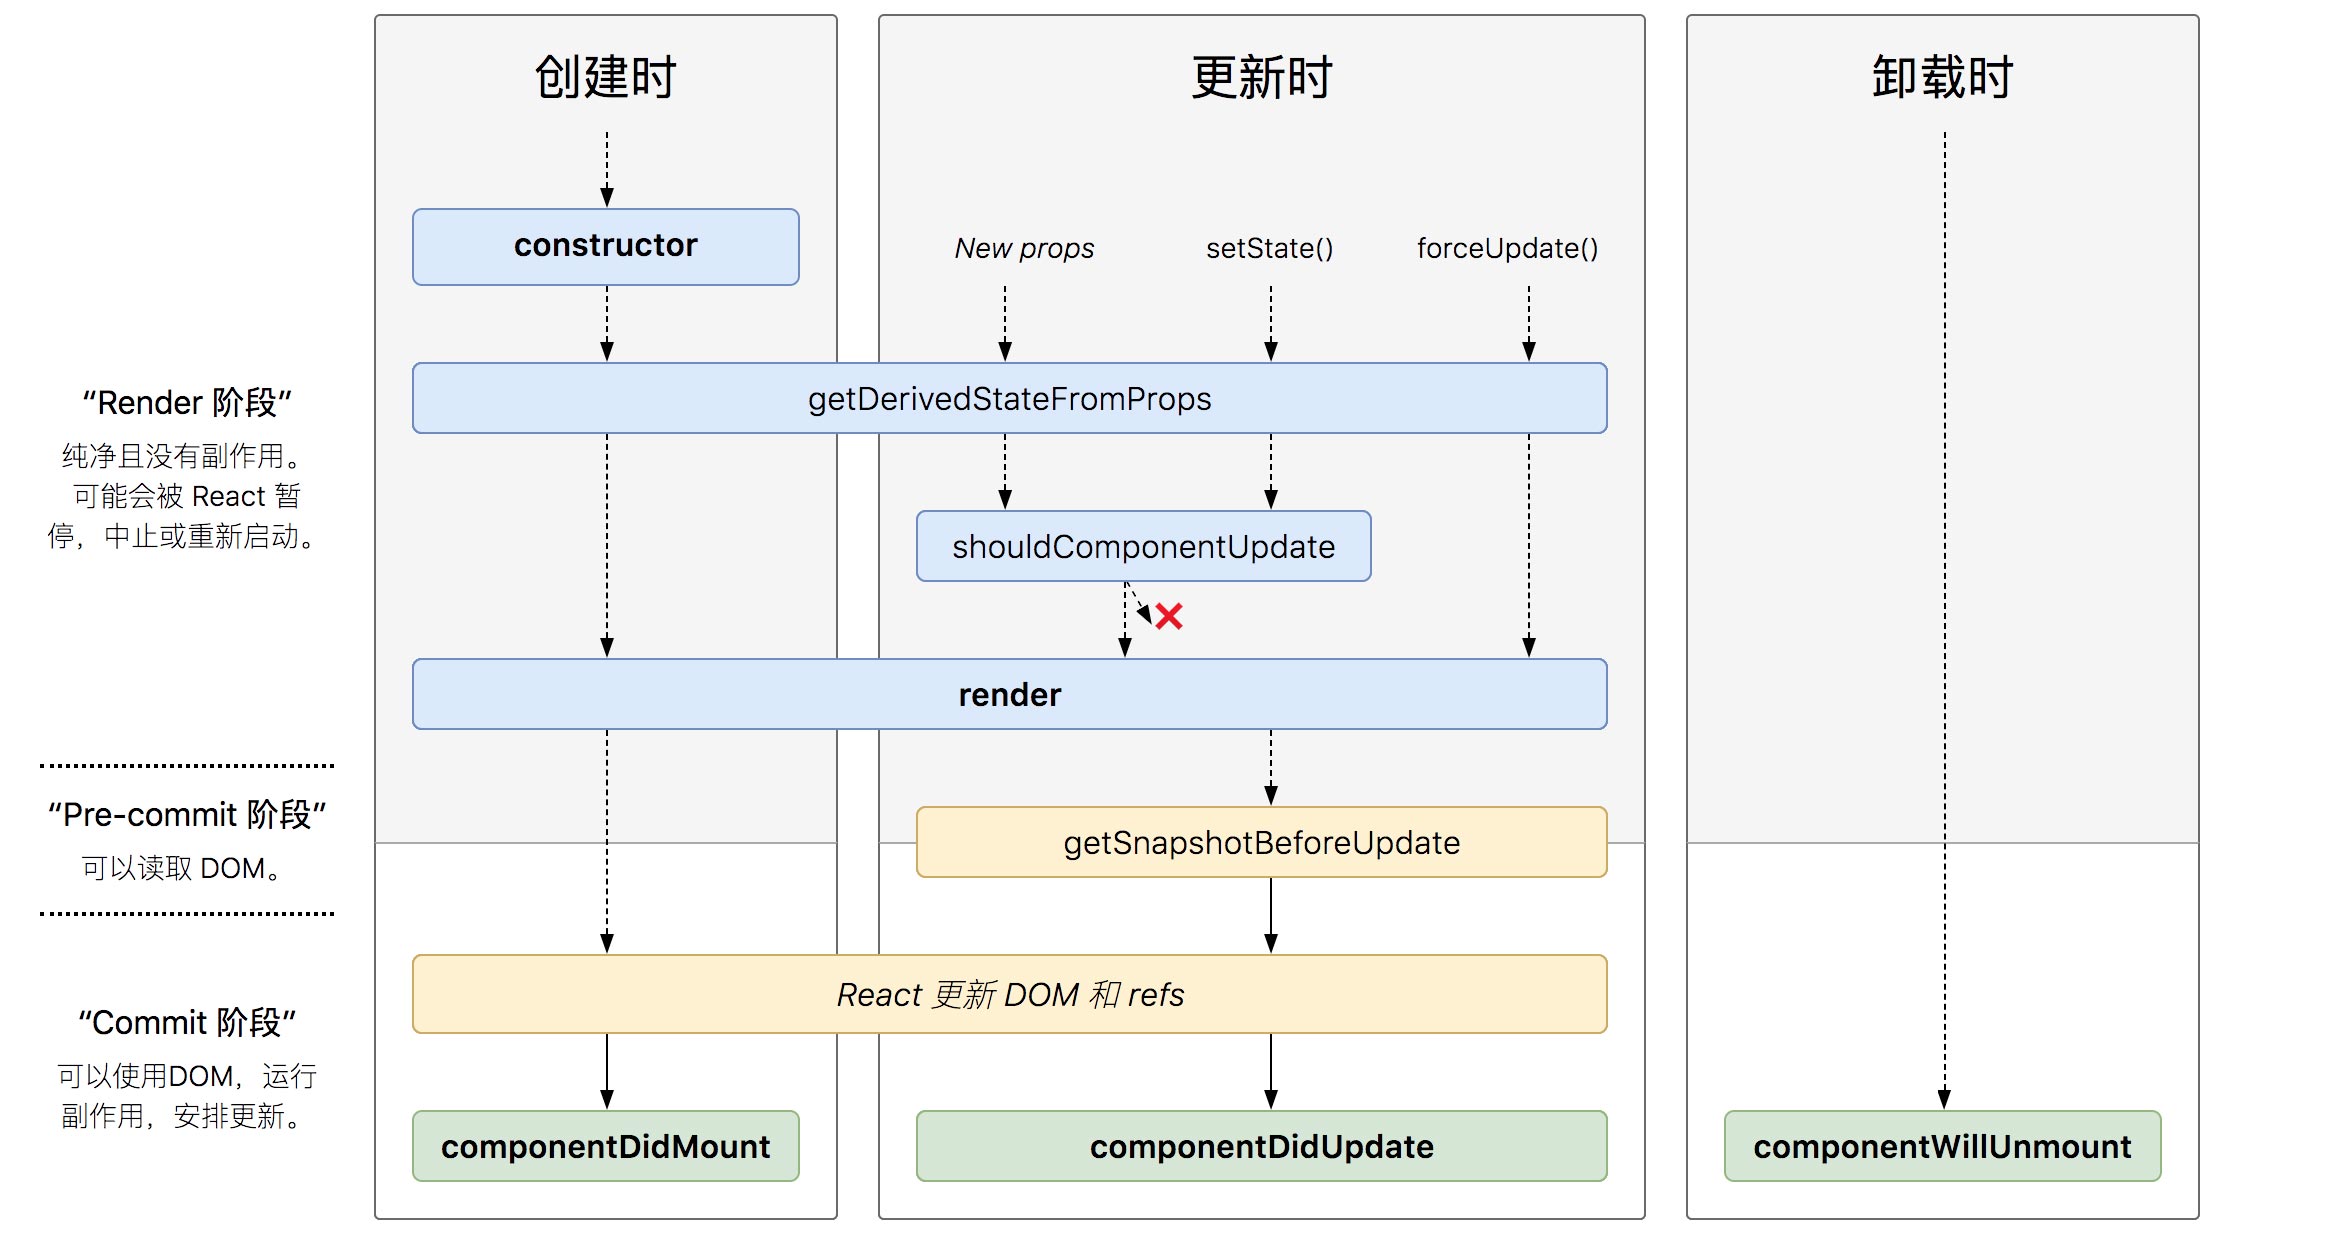
- 新版的生命周期去掉了三个钩子
- componentWillReceiveProps
- componentWillMount
- componentWillUpdata
- 新增了 2 个 1 个方法
- getDerivedStateFromProps
- 每当状态、属性变更的时候会执行此方法
- 可以通过最新的属性得到最新状态
- 使用这个方法就不能在使用 componentWillReceiveProps 跟 componentWillUpdata
查看例子(1)
- getSnapshotBeforeUpdate
- getSnapshotBeforeUpdate 被调用于 render 之后,可以读取但是无法使用的 DOM,它可以使你的组件在可能更改之前从 DOM 捕获一些信息例如(滚动位置)
- 在没有 getSnapshotBeforeUpdate 之前 react 无法实现的的一个效果
查看例子(2)
- forceUpdate // 强制更新(当组件的属性和状态都没有改变的时候,我们也想刷新会使用这个)
- getDerivedStateFromProps
例子(1):
// 前面要加static,nextProps新的属性对象,prevState代表老的状态对象
static getDerivedStateFromProps(nextProps, prevState){
  const { number } = nextProps;
  // 当传入的type发生变化的时候,更新state
  if (number % 2 === 0) {
      return { number: number * 2 };
  } else {
      return { number: number * 3 };
  }
}
例子(2):旧版的react做固定滚动列表的时候存在个问题,无法固定当前位置(DOM不断的添加scrollTop会不断被卷去)如下图:
我们通过新版中的getSnapshotBeforeUpdate 在render之后获取DOM信息在componentDidUpdate更新后再去设置scrollTop值来解决这个问题
//很关键的,我们获取当前rootNode的scrollHeight,传到componentDidUpdate 的参数perScrollHeight
getSnapshotBeforeUpdate() {
  return this.wrapper.current.scrollHeight;
}
componentDidUpdate(pervProps, pervState, prevScrollHeight) {
  //当前向上卷去的高度
  const curScrollTop = this.wrapper.current.scrollTop;
  //当前向上卷去的高度加上增加的内容高度
  this.wrapper.current.scrollTop = curScrollTop + (this.wrapper.current.scrollHeight - prevScrollHeight);
}
- 小知识:
- 为什么请求数据要写在 componentDidMount 里面?
- 因为历史原因(旧版的 react 写的不好)componentWillMount 可能会被执行多次而且方法被废除,只能写在 componentDidMount 里
- 为什么请求数据要写在 componentDidMount 里面?
Hooks 中的 useEffect
- 可以把 useEffect Hook 看做 componentDidMount,componentDidUpdate 和 componentWillUnmount 这三个函数的组合。这里不做深入介绍,他是执行副作用操作的钩子函数
事件处理&ref
- React 事件的命名采用小驼峰式(camelCase),而不是纯小写。
- 使用 JSX 语法时你需要传入一个函数作为事件处理函数,而不是一个字符串
- 你不能通过返回
false的方式阻止默认行为。你必须显式的使用preventDefault
class Link extends React.Component {
  handleClick(e) {
    e.preventDefault();
    console.log("The link was clicked.");
  }

  render() {
    return (
      <a href="http://www.baidu.com" onClick={this.handleClick}>
        Click me
      </a>
    );
  }
}
this
- 你必须谨慎对待 JSX 回调函数中的 this,可以使用:
- 公共属性(箭头函数)
- 匿名函数
- bind 进行绑定
class LoggingButton extends React.Component {
  handleClick() {
    console.log("this is:", this);
  }
  handleClick1 = () => {
    console.log("this is:", this);
  };
  render() {
    //onClick={this.handleClick.bind(this)
    return (
      <button onClick={(event) => this.handleClick(event)}>Click me</button>
    );
  }
}
向事件处理程序传递参数
- 匿名函数
- bind
- bind 传参数的时候,第二个参数是事件对象 event
class LoggingButton extends React.Component {
  handleClick1 = (id, event) => {
    console.log("id:", id);
  };
  render() {
    return (
      <>
        <button onClick={(event) => this.handleClick("1", event)}>
          Click me
        </button>
        <button onClick={this.handleClick.bind(this, "1")}>Click me</button>
      </>
    );
  }
}
ref
- Refs 提供了一种方式,允许我们访问 DOM 节点或在 render 方法中创建的 React 元素
- ref 值是
字符串
class Sum extends React.Component {
  handleAdd = (event: React.MouseEvent) => {
    let a = this.refs.a.value;
    let b = this.refs.b.value;
    this.refs.c.value = a + b;
  };

  render() {
    return (
      <>
        <input ref="a" />+<input ref="b" />
        <button onClick={this.handleAdd}>=</button>
        <input ref="c" />
      </>
    );
  }
}- ref 值是
函数
class Sum extends React.Component {
  handleAdd = (event) => {
    let a = this.a.value;
    let b = this.b.value;
    this.result.value = a + b;
  };
  render() {
    return (
      <>
        <input ref={(ref) => (this.a = ref)} />+
        <input ref={(ref) => (this.b = ref)} />
        <button onClick={this.handleAdd}>=</button>
        <input ref={(ref) => (this.result = ref)} />
      </>
    );
  }
}- DOM 元素添加 ref
- 可以使用 ref 去存储 DOM 节点的引用
- 当 ref 属性用于 HTML 元素时,构造函数中使用 React.createRef() 创建的 ref 接收底层 DOM 元素作为其 current 属性
- 真实 DOM 就是
current
class Sum extends React.Component {
  constructor(props) {
    super(props);
    this.a = React.createRef();
    this.b = React.createRef();
    this.result = React.createRef();
  }
  handleAdd = () => {
    let a = this.a.current.value;
    let b = this.b.current.value;
    this.result.current.value = a + b;
  };
  render() {
    return (
      <>
        <input ref={this.a} />+<input ref={this.b} />
        <button onClick={this.handleAdd}>=</button>
        <input ref={this.result} />
      </>
    );
  }
}- class 组件添加 Ref
- 当 ref 属性用于自定义 class 组件时,ref 对象接收组件的挂载实例作为其 current 属性
- 组件实例就是
current
class Form extends React.Component {
  constructor(props) {
    super(props);
    this.input = React.createRef();
  }
  getFocus = () => {
    this.input.current.getFocus();
  };
  render() {
    return (
      <>
        <TextInput ref={this.input} />
        <button onClick={this.getFocus}>获得焦点</button>
      </>
    );
  }
}
class TextInput extends React.Component {
  constructor(props) {
    super(props);
    this.input = React.createRef();
  }
  getFocus = () => {
    this.input.current.focus();
  };
  render() {
    return <input ref={this.input} />;
  }
}- 在函数组件中使用 ref,你可以使用
function CustomTextInput(props) {
  // 这里必须声明 textInput,这样 ref 才可以引用它
  const textInput = useRef(null);

  function handleClick() {
    textInput.current.focus();
  }

  return (
    <div>
      <input type="text" ref={textInput} />
      <input type="button" value="Focus the text input" onClick={handleClick} />
    </div>
  );
}- ref 转发
- 你不能在函数组件上使用 ref 属性 ,因为他们没有实例
class Form extends React.Component {
  constructor(props) {
    super(props);
    this.input = React.createRef();
  }
  getFocus = () => {
    this.input.current.getFocus();
  };
  render() {
    return (
      <>
        <TextInput ref={this.input} />
        <button onClick={this.getFocus}>获得焦点</button>
      </>
    );
  }
}
// Function components cannot be given refs. Attempts to
// access this ref will fail. Did you mean to use React.forwardRef()?
function TextInput() {
  return <input />;
}- 使用 forwardRef
- Ref 转发是一项将 ref 自动地通过组件传递到其一子组件的技巧
- Ref 转发允许某些组件接收 ref,并将其向下传递(换句话说,“转发”它)给子组件
// forwardRef转发函数组件
const TextInput = React.forwardRef((props, ref) => <input ref={ref} />);
class Form extends React.Component {
  input;
  constructor(props) {
    super(props);
    this.input = React.createRef();
  }
  getFocus = () => {
    console.log(this.input.current);
    this.input.current.focus();
  };
  render() {
    return (
      <>
        <TextInput ref={this.input} />
        <button onClick={this.getFocus}>获得焦点</button>
      </>
    );
  }
}
条件渲染
- 使用 Javascript 运算符 if 或者 条件运算符 去创建元素来表现当前的状态。
- if
- 声明一个变量并使用 if 语句进行条件渲染是不错的方式
function UserGreeting(props) {
  return <h1>Welcome back!</h1>;
}

function GuestGreeting(props) {
  return <h1>Please sign up.</h1>;
}
function Greeting(props) {
  const isLoggedIn = props.isLoggedIn;
  if (isLoggedIn) {
    return <UserGreeting />;
  }
  return <GuestGreeting />;
}

ReactDOM.render(
  // 尝试更改为 isLoggedIn={true}:
  <Greeting isLoggedIn={false} />,
  document.getElementById("root")
);- 与运算符 &&
- 更为方便地进行元素的条件渲染
function Mailbox(props) {
  const unreadMessages = props.unreadMessages;
  return (
    <div>
      <h1>Hello!</h1>
      {unreadMessages.length > 0 && (
        <h2>You have {unreadMessages.length} unread messages.</h2>
      )}
    </div>
  );
}
const messages = ["React", "Re: React", "Re:Re: React"];
ReactDOM.render(
  <Mailbox unreadMessages={messages} />,
  document.getElementById("root")
);- 三目运算符
- 另一种内联条件渲染的方法是使用 JavaScript 中的三目运算符 condition ? true : false。
render() {
  const isLoggedIn = this.state.isLoggedIn;
  return (
    <div>
      {isLoggedIn
        ? <LogoutButton onClick={this.handleLogoutClick} />
        : <LoginButton onClick={this.handleLoginClick} />
      }
    </div>
  );
}- 阻止组件渲染
- 你可能希望能隐藏组件,即使它已经被其他组件渲染。若要完成此操作,你可以让 render 方法直接返回 null,而不进行任何渲染。
- 重点:在组件的 render 方法中返回 null 并不会影响组件的生命周期。(组件只是阻止渲染,而不是销毁)
- 优化:在做一些选项卡切换的时候,我们并不想直接销毁切换前的一些数据时就会用到这种方式,不建议直接销毁,看如下例子:
// 这样切换时会直接销毁组件,导致重复的走一遍组件生命周期(不推荐)
function WarningBanner(props) {
  return <div className="warning">Warning!</div>;
}
class Page extends React.Component {
  constructor(props) {
    super(props);
    this.state = {
      showWarning: false,
    };
  }
  render() {
    return <div>{this.state.showWaring ? <WarningBanner /> : null}</div>;
  }
}

// 使用组件返回null并不会影响组件生命周期(推荐)
function WarningBanner(props) {
  if (!props.warn) {
    return null;
  }
  return <div className="warning">Warning!</div>;
}
class Page extends React.Component {
  constructor(props) {
    super(props);
    this.state = { showWarning: true };
    this.handleToggleClick = this.handleToggleClick.bind(this);
  }

  handleToggleClick() {
    this.setState((state) => ({
      showWarning: !state.showWarning,
    }));
  }

  render() {
    return (
      <div>
        <WarningBanner warn={this.state.showWarning} />
        <button onClick={this.handleToggleClick}>
          {this.state.showWarning ? "Hide" : "Show"}
        </button>
      </div>
    );
  }
}
列表渲染&Key
- 常用 map 函数来遍历数组,将数组中的每个元素变成
<li>标签,返回新数组进行赋值,然后渲染进 DOM
- 如果一个 map() 嵌套了太多层级,那可能就是你提取组件的一个好时机。
const numbers = [1, 2, 3, 4, 5];
const listItems = numbers.map((number) => <li>{number}</li>);- key 帮助 React 识别哪些元素改变了,比如被添加或删除。因此你应当给数组中的每一个元素赋予一个确定的标识。
- key 只是在兄弟节点之间必须唯一(不需要全局唯一)
- 注意:key 应该在遍历的时候进行定义
const numbers = [1, 2, 3, 4, 5];
const listItems = numbers.map((number) => (
  <li key={number.toString()}>{number}</li>
));
状态提升
- 多个组件需要反映相同的变化数据,这时我们建议将共享状态提升到最近的共同父组件中去。这就是状态提升
组合 vs 继承
- 包含关系 children
- 有些组件无法提前知晓它们子组件的具体内容,建议使用 children prop 来将他们的子组件传递到渲染结果中
function FancyBorder(props) {
  return (
    <div className={"FancyBorder FancyBorder-" + props.color}>
      {props.children}
    </div>
  );
}

function WelcomeDialog() {
  return (
    <FancyBorder color="blue">
      <h1 className="Dialog-title">Welcome</h1>
      <p className="Dialog-message">Thank you for visiting our spacecraft!</p>
    </FancyBorder>
  );
}- 那么继承呢?
- 在成百上千个组件中使用 React。我们并没有发现需要使用继承来构建组件层次的情况。
- Props 和组合为你提供了清晰而安全地定制组件外观和行为的灵活方式。注意:组件可以接受任意 props,包括基本数据类型,React 元素以及函数。
- 如果你想要在组件间复用非 UI 的功能,我们建议将其提取为一个单独的 JavaScript 模块,如函数、对象或者类。组件可以直接引入(import)而无需通过 extend 继承它们。
Context(上下文)
在某些场景下,你想在整个组件树中传递数据,但却不想手动地在每一层传递属性。你可以直接在 React 中使用强大的 contextAPI 解决上述问题
数据是通过 props 属性自上而下(由父及子)进行传递的,但是这种做法对于某些类型的属性而言是极其繁琐的(例如:地区/偏好/UI 主题等)属性是应用程序中许多组件都需要的。Context 提供了一种在组件之间共享此类值的方式,而不必显式地通过组件树的逐层传递 props。
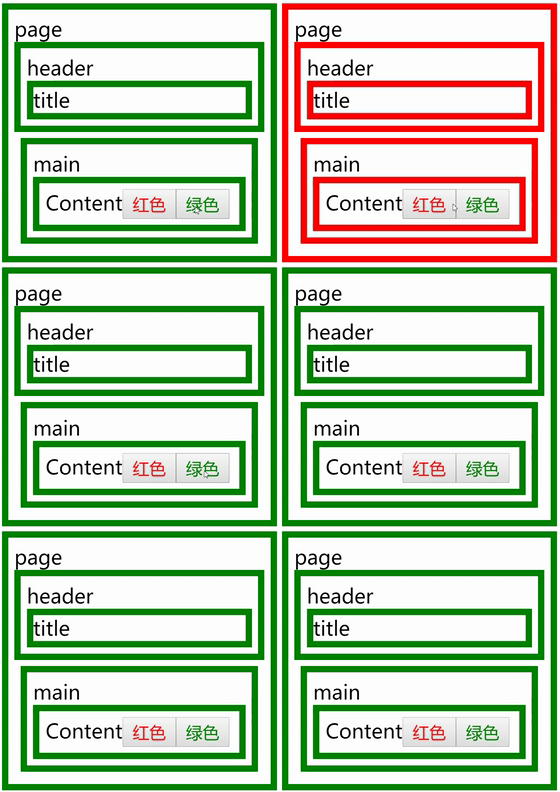
Context 设计目的是为了共享那些对于一个组件树而言是“全局”的数据,例如当前认证的用户、主题或首选语言。举个例子:
class App extends React.Component {
  render() {
    return <Toolbar theme="dark" />;
  }
}

function Toolbar(props) {
  // Toolbar 组件接受一个额外的“theme”属性,然后传递给 ThemedButton 组件。
  // 如果应用中每一个单独的按钮都需要知道 theme 的值,这会是件很麻烦的事,
  // 因为必须将这个值层层传递所有组件。
  return (
    <div>
      <ThemedButton theme={props.theme} />
    </div>
  );
}

class ThemedButton extends React.Component {
  render() {
    return <Button theme={this.props.theme} />;
  }
}
使用 context, 我们可以避免通过中间元素传递 props:
// Context 可以让我们无须明确地传遍每一个组件,就能将值深入传递进组件树。
// 为当前的 theme 创建一个 context(“light”为默认值)。
const ThemeContext = React.createContext("light");
class App extends React.Component {
  render() {
    // 使用一个 Provider 来将当前的 theme 传递给以下的组件树。
    // 无论多深,任何组件都能读取这个值。
    // 在这个例子中,我们将 “dark” 作为当前的值传递下去。
    return (
      <ThemeContext.Provider value="dark">
        <Toolbar />
      </ThemeContext.Provider>
    );
  }
}

// 中间的组件再也不必指明往下传递 theme 了。
function Toolbar() {
  return (
    <div>
      <ThemedButton />
    </div>
  );
}

class ThemedButton extends React.Component {
  // 指定 contextType 读取当前的 theme context。
  // React 会往上找到最近的 theme Provider,然后使用它的值。
  // 在这个例子中,当前的 theme 值为 “dark”。
  static contextType = ThemeContext;
  render() {
    return <Button theme={this.context} />;
  }
}- 函数组件的使用
const themes = {
  light: {
    foreground: "#000000",
    background: "#eeeeee",
  },
  dark: {
    foreground: "#ffffff",
    background: "#222222",
  },
};

const ThemeContext = React.createContext(themes.light);

function App() {
  return (
    <ThemeContext.Provider value={themes.dark}>
      <Toolbar />
    </ThemeContext.Provider>
  );
}

function Toolbar(props) {
  return (
    <div>
      <ThemedButton />
    </div>
  );
}

function ThemedButton() {
  const theme = useContext(ThemeContext);
  return (
    <button style={{ background: theme.background, color: theme.foreground }}>
      I am styled by theme context!
    </button>
  );
}- 注意:
- Context 主要应用场景在于很多不同层级的组件需要访问同样一些的数据。请谨慎使用,因为这会使得组件的复用性变差。
样式写法
- 行内样式
- 外部样式
- CSS-module